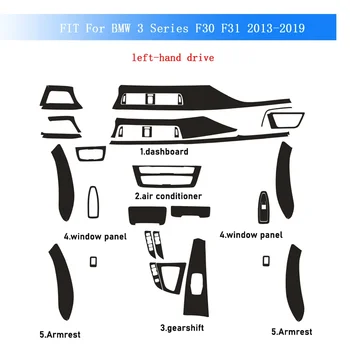
Give your BMW 3 Series F30 or F31 a sharper, sportier interior without replacing a single factory part. This precision pre-cut carbon fiber vinyl film kit covers the highest-visibility surfaces inside your cabin, including the center console, gear shift surround, dashboard trim, air vent bezels, door handle panels, and lift panel. The self-adhesive 5D carbon fiber film bonds directly over the original panels with no drilling, no cutting, and no professional installation required. The result is a factory-finish appearance that looks deliberate, not aftermarket. Available in left-hand drive (LHD) and right-hand drive (RHD) configurations to suit both Australian and international markets.
Key Features and Benefits
Precision pre-cut pieces fit directly to the F30 and F31 interior contours with no trimming required, eliminating guesswork and wasted material.
The 5D carbon fiber weave pattern delivers genuine depth and texture, unlike flat-printed films that look artificial in direct light.
Self-adhesive PET vinyl backing bonds strongly to clean interior surfaces and remains repositionable during application for accurate placement before final press.
The hard-coated scratch-resistant surface holds up to daily contact from hands, fingernails, cleaning cloths, and UV exposure without fading or yellowing.
Covers six distinct interior zones in one kit: center console trim, gear shift surround, dashboard panel, air vent trim, door handle covers, and lift panel.
Available in both LHD and RHD configurations, making it a correct-fit purchase for Australian right-hand drive vehicles.
No permanent modification to factory panels. The film is removable without damaging original surfaces, preserving resale value.
Wipe-clean surface requires no special maintenance and resists moisture and common interior cleaning products.
Material, Finish and Colour Options
Material: Self-adhesive PET (polyethylene terephthalate) vinyl film with carbon fiber weave surface texture
Finish: 5D carbon fiber gloss weave with hard-coat scratch-resistant topcoat
Colour Options: 5D Carbon Fiber Black (available in LHD and RHD variants)
Vehicle Compatibility and Model Years
Compatible Vehicles:
BMW 3 Series F30 Sedan 2013 to 2019
BMW 3 Series F31 Touring 2013 to 2019
Drivetrain Variants: Left-Hand Drive (LHD) and Right-Hand Drive (RHD) versions available. Buyers must select the correct variant for their vehicle. Australian-delivered BMW 3 Series models are RHD. If uncertain, contact the seller prior to ordering.
Exclusions: Not compatible with pre-2013 E90/E91/E92 3 Series or post-2019 G20 3 Series. Not suitable for F34 Gran Turismo or F80 M3 without verification.
Dimensions and Technical Details
Sticker placement: Internal suite kit covering multiple cabin panels
Number of pieces: Multi-piece set covering up to six interior zones
Fitment type: Precision pre-cut to factory panel dimensions, no field trimming required
Adhesive type: Pressure-sensitive self-adhesive, no additional adhesive required
Temperature tolerance: Rated from 40 degrees Celsius below zero to 120 degrees Celsius, suitable for Australian climate conditions including high summer cabin temperatures
UV resistance: UV-stabilised coating prevents fading, yellowing, and surface degradation under prolonged sun exposure
Packaging note: Minor wrinkles upon unpacking are normal and do not affect the product. Heat from a hair dryer or heat gun softens the film and removes wrinkles prior to application.
Measurement tolerance: Allow 0.5 to 1 centimetre variance due to manual pre-cutting processes.
Origin: Mainland China
Installation Notes and Special Functions
Step 1: Thoroughly clean each target panel surface with isopropyl alcohol and a lint-free cloth. Allow to dry completely before applying any film.
Step 2: Lightly mist the panel or the film backing with water to allow repositioning during initial placement.
Step 3: Align each pre-cut piece to its corresponding panel. Work from the center outward using a squeegee or soft cloth to eliminate air bubbles.
Step 4: Once correctly positioned, press firmly across the full surface to activate the adhesive bond.
Step 5: Use a hair dryer or heat gun on low setting to soften the film around curved edges and recessed areas. This prevents lifting and ensures the film conforms fully to the panel contour.
Step 6: Press all edges down firmly after heating. No sealant is required.
Note: It is not necessary to remove original factory panels before applying the film. The kit is pre-sized to paste directly over existing surfaces in place.
Note: Do not apply to dirty, damp, or recently waxed surfaces. Adhesion failure caused by improper surface preparation is not a product defect.
Professional installation is recommended for buyers unfamiliar with vinyl film application. Actual product colours may vary slightly from screen representations due to monitor calibration differences.